Painting with Natural Dyes

Artistic Advantages of Natural Dyes

Upright Citizen -10x8 - ink & natural dyes on paper (Sep 2013)

I cannot remember when creating ink drawings of natural objects, using natural dyes instead of regular paints, first appealed… Drawing a branch, a twig, a group of leaves or some fruit, and embellishing it with what are essentially water based paints from equally natural objects like bark, seeds, leaves, roots, just feels “right”.

Natural dyes certainly give a different effect to even watercolors, although the techniques of applying them to the paper is similar to watercolor painting. Natural dye colors tend to be subtle, so you have to build up saturation and intensity through continual overpainting until the right tone is reached. But that very subtleness can add a dimension to the work that brighter colors can’t emulate. They force the viewer to really look at the piece. It also forces the artist to create a drawing that is as close to perfect as possible, as there is nowhere to hide, every mistake shows.

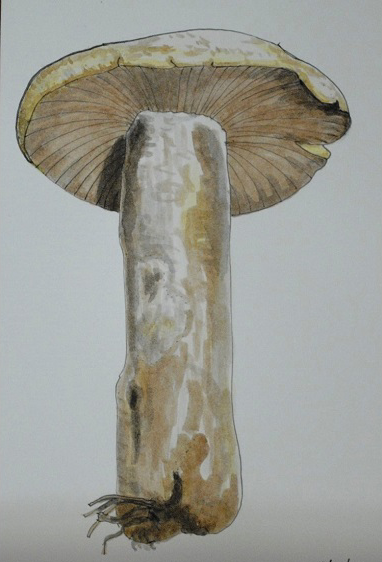
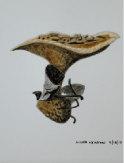
Here’s an example of the difference between using natural dyes and pastels: I did the following two drawings of a toadstool picked in the Sloan Gorge Preserve near Woodstock (under the care of the Woodstock Land Conservatory). With one I used natural dyes, the other pastels, to fill in the spaces and add color to the india ink drawing.

The pastel-painted picture is certainly more dramatic, but the illustration using natural dyes—onion skins,  coffee/tea mix, walnut husks (dark brown), as well as ink washes – is visually more subtle as the viewer has to really look at the piece to see the shapes and indentations of the plant.

In the Woods - 10x8 - ink, natural dyes on paper (Sep 2013)

King of the Woods - 10x8 - ink & pastel on paper (Sep 2013)

Cooking Lessons

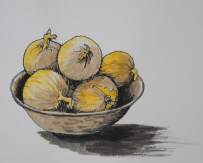
Bowl of Onions - 10x8 - ink, natural dyes on paper (Apr 2013) Ink, turmeric and black walnut are used here


One intriguing aspect of using natural dyes as part of one’s palette, is actually finding them and creating them from scratch. Although there are some websites and stores where you can buy some of the dyes, many are not sold. You have to find the plants (usually wild, or garden weeds) and pick them yourself. You then have to make the dyes yourself. And learn from your mistakes.

There is a lot of testing involved, and trial and error. It is like becoming a cook for a paleo diet–there aren’t many published recipes out there!

There are several good books on natural dyes, but they are all aimed at fabric dyers and textile artists, which is fun and useful in itself, but it leaves the environment for a painter more open and exploratory. I’ve ended up growing some of my own plants, or coveting, say, a good stand of walnut trees where I can pick up the seed husks in the autumn for my next batch of walnut dye.

Personally, I’ve barely scratched the world of natural dyes, and am still in the process of experiencing the more common ones. Here are my observations on the few I’ve been using so far (they are all the illustrations here). This list will be updated as I continue to explore more dyes and techniques.

Basic Recipe: I boil, then simmer the plant part which yields the dye for several hours so the remaining liquid has a strong color. A small amount of liquid/dye goes a very long way when painting, so there is no need to make large batches. In fact, I’ve had bottles of these homemade dyes sit in the fridge for a year and start to go moldy or fill with bacteria because they haven’t been used up. If I have to use a mouldy batch, I zap it in the microwave as that removes the unwanted residents.

Apart from beets and turmeric, all of the items below contain a lot of tannin, which is a potent natural mordant. Mordants make the dye fast, i.e., permanent, something all dyers are concerned with.

Dogwood Berries Two - 10x8 - ink, natural dyes on paper (Apr 2013) I used beet and onion skins for coloring here


Walnut husks. Require a lot of boiling and simmering, but the deep brown that results is well worth it. This is the burnt umber of the natural dye world, so is constantly  useful for shading, adding strong values and dark coloring.
Onion skins. Strongly colored skins are best, from red or bright orange onions. They boil down to a rich gold color that creates a subtle gold wash that can be built up through repeated layers. It’s a distinctive gentle red gold that often dries a darker color than when you paint it on.
Tea/coffee. Best use fresh tea and coffee, the color is stronger. It is never as strong or saturated as walnut, but can add subtle brown colors to areas where you don’t want a strong dark value.
Turmeric. A strong rich yellow is created that can add some saturated color to a picture. It is apparently fugitive, but I haven’t experienced that. However, ink and watercolor paintings are rarely exposed to direct sunlight, whereas fabrics are victim to the sun’s rays all the time.
Beets. I’ve found this pleasant deep red to be quite fugitive. I haven’t yet found a way to make this color fast, but when I do, I’ll let you know.

That’s it for now.  Currently, I’m experimenting with indigo, madder, and dragons blood, and will report back at a later date.

References:

Wild Color, the complete guide to making and using natural dyes. Jenny Dean. Watson-Guptill Publications.

Kremer Pigments. 247 West 29 Street, New York, NY 10001.